Why Is My Toilet Running? How to Find and Fix the Cause
A toilet that keeps running, hisses, or refills on its own every so often is one of the most common plumbing annoyances in any home. It is also one of the easiest to fix yourself. In most cases the culprit is a worn flapper, a chain that is the wrong length, a water level set too high, or a fill valve with debris in it.
This guide walks you through a simple test to find which part is causing the problem, then the step-by-step fix for each one, and when it makes sense to call a plumber instead.
This is general information only. If you’re not comfortable working on plumbing, or a shutoff valve won’t close, call a licensed plumber.
Why a Running Toilet Is Worth Fixing Quickly
A running toilet wastes water every minute it runs, and the waste adds up quietly because most of it goes straight down the drain. According to the EPA’s WaterSense program, worn toilet flappers are among the most common household leaks, and fixing easily corrected leaks can save homeowners about 10 percent on their water bills.
A constantly running toilet also wears out the fill valve faster and can mask other problems. The good news is that the parts involved are inexpensive and standard on most two-piece toilets.
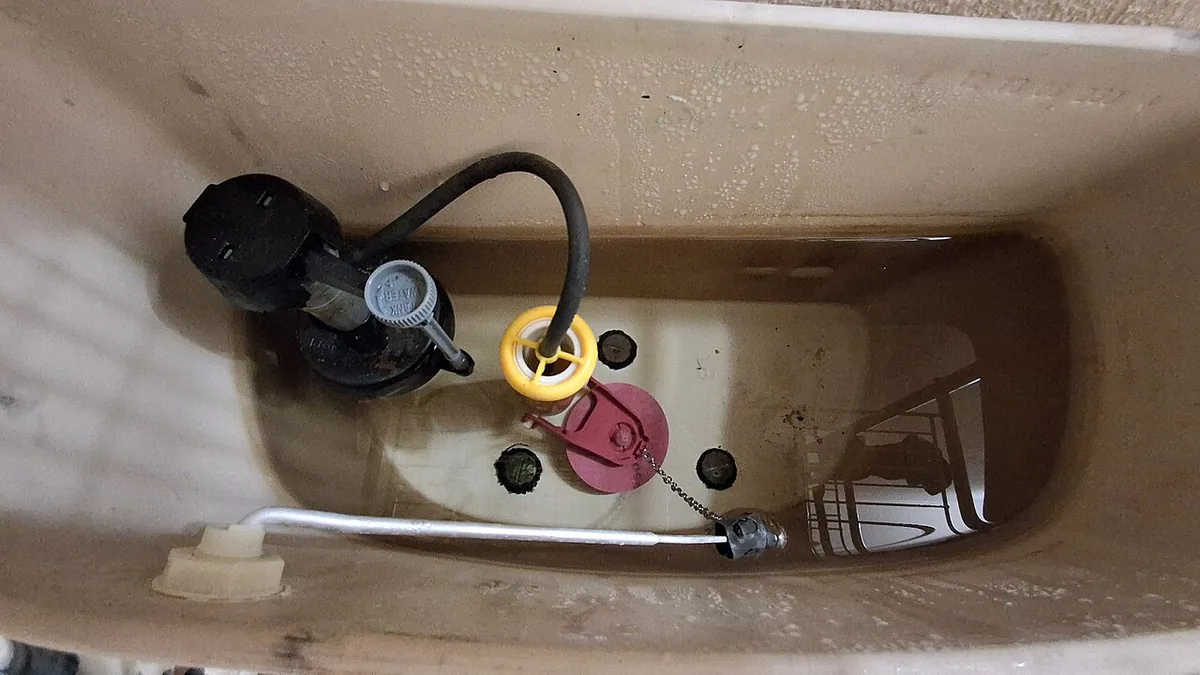
How a Toilet Tank Works (in 30 Seconds)
Lift the tank lid and you’ll see two main parts:
- The flush valve: the large opening at the bottom of the tank, sealed by a rubber or silicone flapper. The tall open pipe attached to it is the overflow tube.
- The fill valve: the tower on the left side (usually) that refills the tank from the water supply. It shuts off when its float rises to the set level.
- The flush lever (trip lever) and chain: pressing the handle lifts the flapper so tank water rushes into the bowl.
A toilet “runs” for one of two reasons: water is leaking out of the tank into the bowl (so the fill valve keeps topping it off), or the fill valve never shuts off and water spills down the overflow tube. The test below tells you which.
Step 1: Find the Cause With a Dye Test
The EPA recommends a simple dye test: put a few drops of food coloring in the toilet tank and don’t flush. If any color shows up in the bowl after 10 minutes, you have a leak. Flush afterward so the dye doesn’t stain the tank.
You can narrow it down further with a shutoff test, which American Standard recommends before buying parts:
- Turn off the water supply valve behind the toilet (turn it clockwise).
- Mark the water level inside the tank with a pencil.
- Wait 15 to 30 minutes without flushing, then check the level.
What the result means:
- The water dropped to the flapper: the flapper isn’t sealing. Go to Step 2 and Step 3.
- The water dropped all the way to the bottom of the tank: the flush valve itself, or its seal to the tank, is likely leaking. See “When the Flush Valve Is the Problem” below.
- The water didn’t drop, but the toilet runs with the supply on: the fill valve or water level is the issue. Go to Step 4 and Step 5.
Step 2: Check the Flapper Chain
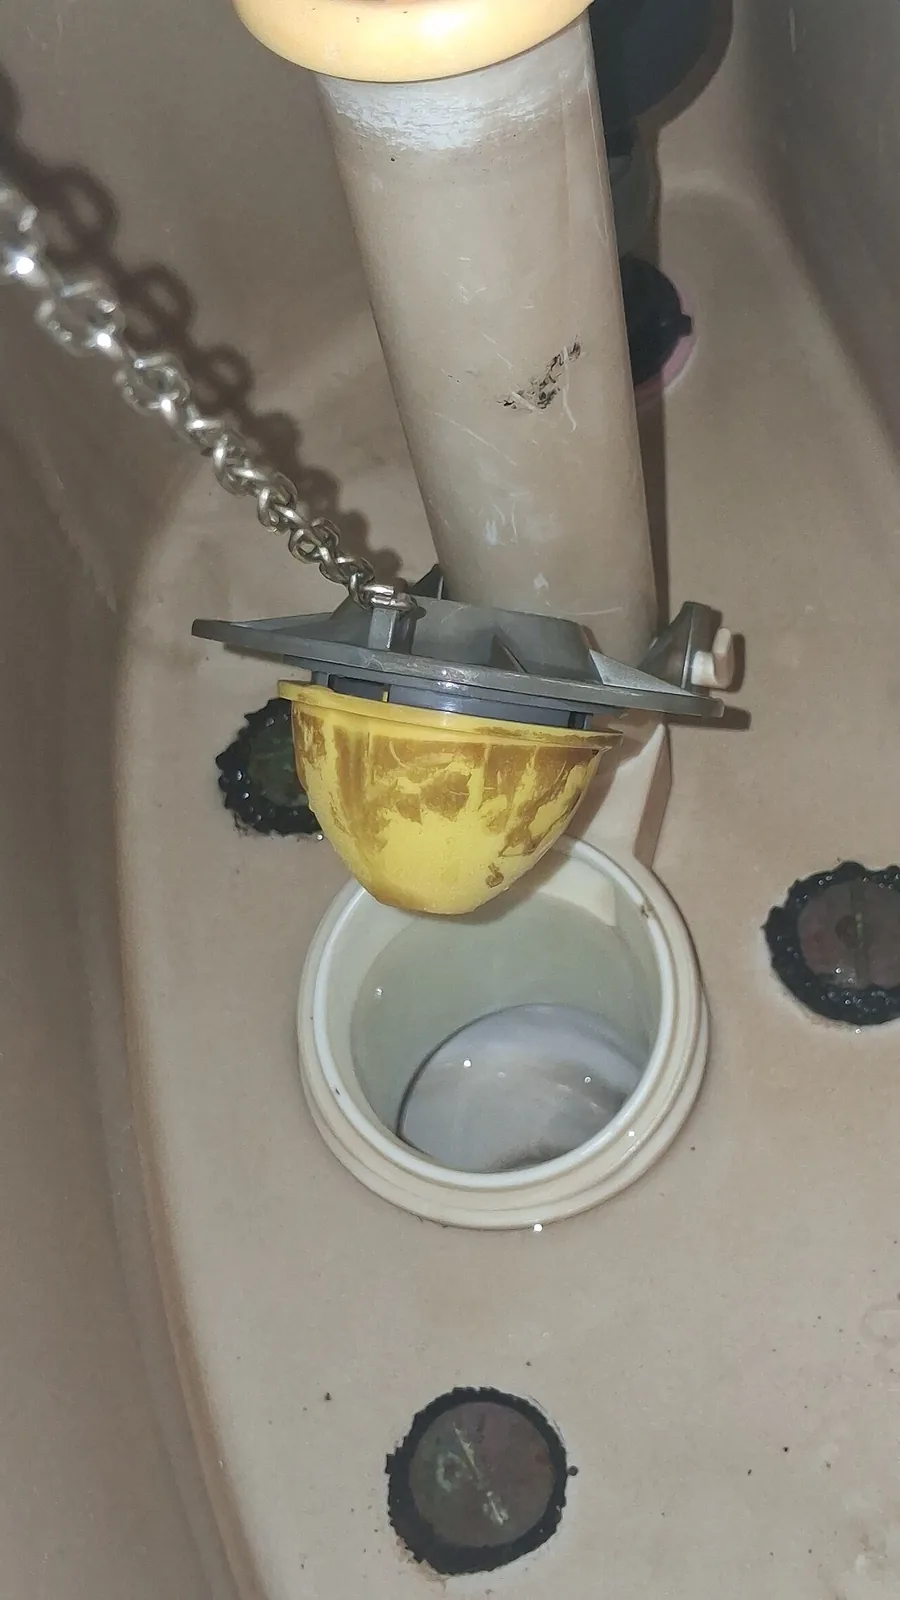
Start with the easiest fix. If the chain between the flush lever and the flapper is too short, it holds the flapper slightly open and water trickles into the bowl. If it’s too long, it can get caught under the flapper and keep it from sealing.
- Look at the chain with the flapper closed. It should have a little slack, not be tight and not be piled up.
- Manufacturers recommend only a small amount of slack. American Standard suggests about a quarter inch, and Fluidmaster suggests about a half inch. Move the clip one or two links to adjust.
- Flush a few times and watch the flapper drop. It should fall straight down and seat evenly.
- Trim any long tail of chain so it can’t get tangled under the flapper.
Also check that the flush handle springs back after you let go. A loose or bent trip lever can hold the flapper open. Tighten the mounting nut inside the tank (it’s often reverse-threaded) or replace the lever if it’s damaged.
Step 3: Clean or Replace the Flapper
Flappers are made of rubber, plastic, or silicone and eventually warp, harden, or collect mineral buildup. The EPA notes that most toilet leaks are due to old or worn-out flappers, and that replacing one is quick and easy.
Clean it first
- Turn off the water supply and flush to empty the tank.
- Unhook the flapper and check its sealing surface for grit, slime, or mineral deposits.
- Wipe the flapper and the flush valve seat (the rim it closes on) with a cloth or a non-abrasive scrub pad. Don’t use anything that scratches the seat.
- Reinstall, turn the water back on, and repeat the dye test.
Replace it if it still leaks
- Note your flush valve size. Most toilets use a 2-inch or 3-inch flapper, and the size usually matches the diameter of the drain opening. Your toilet’s model number (often stamped inside the tank) helps you find an exact match.
- Turn off the water and flush to drain the tank.
- Unhook the chain and slide the old flapper’s ears off the pegs on the overflow tube (or unclip the ring if it slides over the tube).
- Install the new flapper the same way, attach the chain with a little slack, and turn the water back on.
- Flush several times and do another dye test.
Tip: Some toilets, especially newer high-efficiency models, use a brand-specific seal or canister valve instead of a standard flapper. Buy the part the manufacturer lists for your model, since a “universal” flapper may not seal properly.
Step 4: Set the Water Level
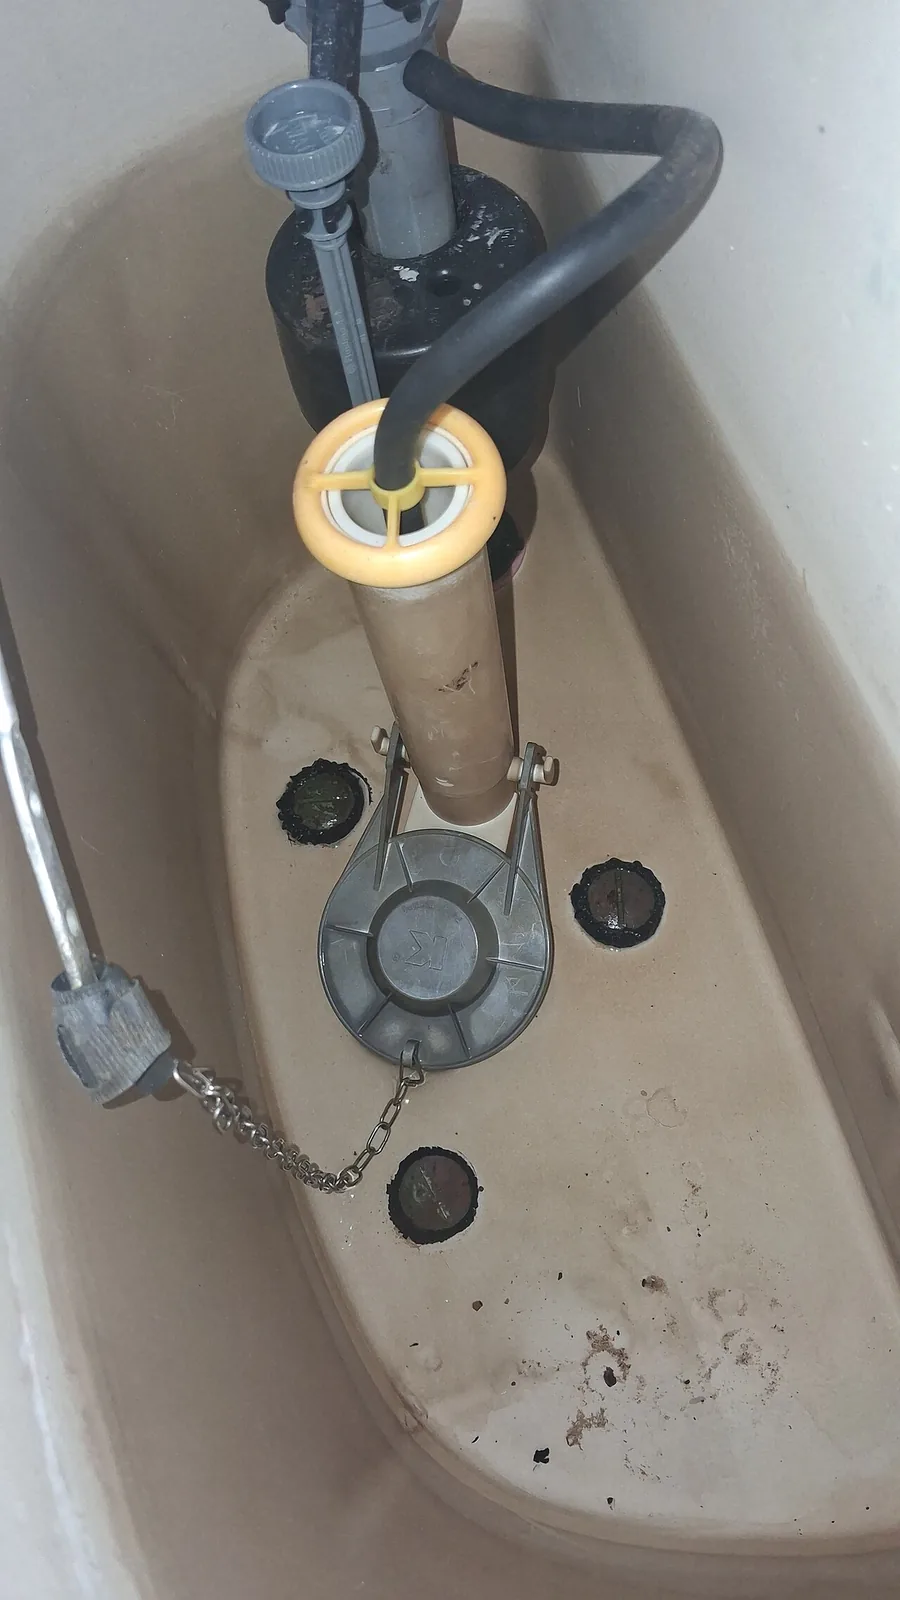
If water keeps flowing down the overflow tube, the tank level is set too high. The fill valve never gets the signal to shut off because the water escapes into the bowl before the float rises far enough.
Manufacturers recommend setting the water level slightly below the top of the overflow tube. American Standard suggests about a quarter to half inch below it, and Fluidmaster recommends about a half inch. Many tanks also have a fill line molded or printed inside them.
- Find the adjustment. Most modern fill valves have a float cup that slides on the shaft with a clip or an adjustment screw or knob. Older toilets have a ball float on a metal or plastic arm.
- To lower the level on a float-cup valve, turn the adjustment screw or knob (check the valve’s direction markings) or slide the cup down.
- To lower the level on a ball float, gently bend the arm down slightly or turn the adjustment screw on top of the valve.
- Flush and let the tank refill. The valve should shut off with the water below the top of the overflow tube.
Step 5: Clean or Replace the Fill Valve
If the level is set correctly but the fill valve still hisses, keeps running, or turns on and off by itself, the valve may have debris in it or a worn seal.
Flush out debris
Fluidmaster’s instructions for its common fill valves call for removing the top cap and checking for debris, and flushing the valve out, if it won’t turn off or the flow is weak. The general process looks like this, but follow the directions for your valve:
- Turn off the water supply and flush to empty the tank.
- Remove the cap on top of the fill valve (on many Fluidmaster valves you press down and twist a quarter turn).
- Hold a cup upside down over the open valve and slowly turn the water supply on and off a few times to flush grit out.
- Inspect the seal under the cap. If it’s hard, cracked, or worn, replace it with the seal made for your valve.
- Reassemble, turn the water on, and test.
Replace the fill valve
If cleaning doesn’t help, or the valve is old, replacing it is a reasonable DIY job. You’ll turn off the water, drain and sponge out the tank, disconnect the supply line, remove the locknut under the tank, and install the new valve at the height its instructions specify. Pay attention to the “critical level” mark: Fluidmaster notes that plumbing code requires the CL mark on the fill valve to sit at least 1 inch above the top of the overflow tube. That anti-siphon gap helps protect your drinking water.
When the Flush Valve Is the Problem
If the dye test shows a leak and the water drops all the way to the bottom of the tank, or a new flapper doesn’t stop it, the flush valve seat may be cracked or pitted, or the seal between the flush valve and the tank may be leaking. American Standard’s guidance is that if the level drops to the bottom of the flush valve, the flush valve needs to be replaced.
Replacing a flush valve on most two-piece toilets means removing the tank from the bowl and replacing the tank-to-bowl gasket and bolts too. It’s doable for a confident DIYer but takes longer and needs care not to crack the porcelain. Many homeowners hand this one to a plumber.
Ghost Flushing: When the Toilet Refills on Its Own
If you hear the toilet briefly refill every so often when no one has used it, that’s often called a “phantom” or “ghost” flush. Fluidmaster explains that a fill valve turning on and off by itself means the tank is losing water and the valve is replacing it. The usual cause is a flapper or flush valve seat that isn’t sealing, so start with Steps 2 and 3. Also check the floor behind the toilet and under the tank for water, since a leak at the tank bolts or supply line can drain the tank too.
Safety Notes
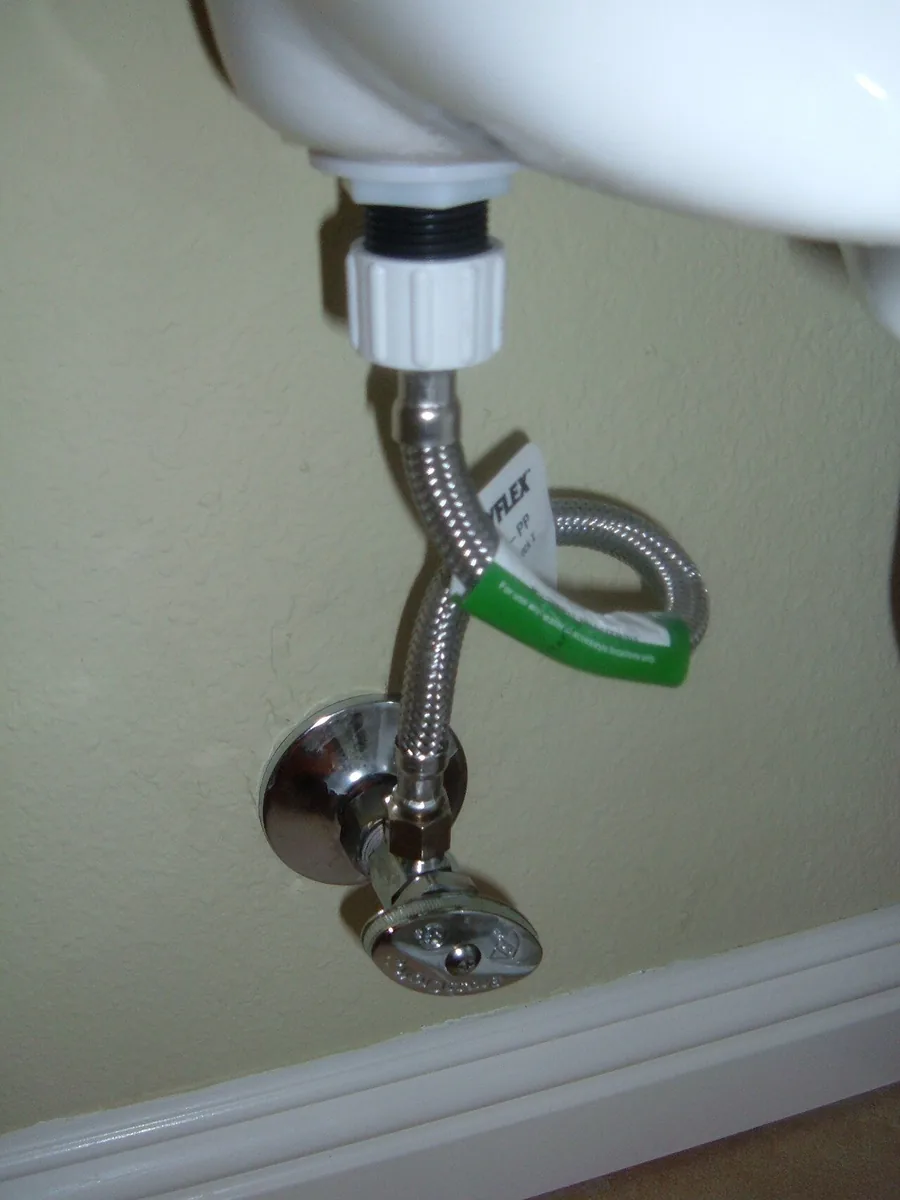

- Always know where your toilet’s shutoff valve is before you start. If it won’t turn or it leaks, don’t force it. Use your home’s main shutoff and consider having a plumber replace the stop valve.
- Tank lids are heavy porcelain. Set the lid on a towel on the floor where it won’t get stepped on or knocked over.
- Don’t overtighten plastic nuts or tank bolts. Porcelain can crack.
- Avoid drop-in tank cleaning tablets unless your toilet’s manufacturer approves them. Some manufacturers warn they can damage flappers and other tank parts.
When to Call a Plumber
Most running toilets can be fixed with a flapper, a chain adjustment, or a fill valve. Call a licensed plumber if:
- The shutoff valve won’t close or is leaking.
- The flush valve needs replacing and you’re not comfortable removing the tank.
- Water is leaking onto the floor from the base, tank bolts, or supply line.
- The tank or bowl is cracked.
- You’ve replaced the flapper and fill valve and it still runs.
- You notice the water meter moving when nothing in the house is using water, which can point to a leak elsewhere.
Leaks elsewhere in the home can also show up as other problems. See our guides on why your water pressure is low and why your water heater is leaking.
Frequently Asked Questions
Why does my toilet keep running after I flush?
The most common causes are a flapper that isn’t sealing, a flapper chain that’s too short or tangled, a water level set above the overflow tube, or a fill valve that won’t shut off. A dye test and a shutoff test will tell you which part to check first.
How do I stop my toilet from running right now?
Lift the tank lid and jiggle the handle or press the flapper down. If it still runs, turn off the supply valve behind the toilet (clockwise). You can turn it back on to flush until you make the repair.
Can a running toilet raise my water bill?
Yes. The water keeps flowing into the bowl and down the drain the whole time it runs. The EPA lists worn toilet flappers among the most common household leaks and says fixing easy leaks can save about 10 percent on water bills.
How often should a toilet flapper be replaced?
There’s no fixed schedule. Replace it when it no longer seals, which you can check with a dye test. Signs of wear include a warped, stiff, or slimy flapper, or one with mineral buildup that cleaning doesn’t remove.
Why does my toilet run every few minutes by itself?
That’s usually a slow leak from the tank into the bowl. The fill valve turns on to replace the lost water. Check the flapper, its chain, and the flush valve seat first.
Is a running toilet an emergency?
Usually not, but don’t ignore it. If water is overflowing the bowl or leaking onto the floor, shut off the supply valve right away and call a plumber if you can’t stop it.
More homeowner guides are in our plumbing section and on the Home Maintenance Guide home page.